Web3j-OpenAPI
Web3j-OpenAPI is an OpenAPI client and server generator from Solidity smart contracts. It provides a way to interact with the Ethereum smart contracts using a simple RESTful API. These interactions can be done using plain HTTP requests or via the Swagger-UI, which is generated with every project.
This workflow can be summed in the following steps:
-
Writing a Solidity smart contract
-
Generating the corresponding Web3j-OpenAPI project using Web3j-CLI
-
Running the generated project as a standalone server
-
Sending HTTP requests using the
Swagger-UI,Java/Kotlinclient,Curlor other.
Example
The following Hello World contract :
// SPDX-License-Identifier: Apache-2.0
pragma solidity ^0.7.0;

// Modified Greeter contract. Based on example at https://www.ethereum.org/greeter.

contract Mortal {
    /* Define variable owner of the type address*/
    address owner;

    /* this function is executed at initialization and sets the owner of the contract */
    constructor () {owner = msg.sender;}

    modifier onlyOwner {
        require(
            msg.sender == owner,
            "Only owner can call this function."
        );
        _;
    }

    /* Function to recover the funds on the contract */
    function kill() onlyOwner public {selfdestruct(msg.sender);}
}

contract HelloWorld is Mortal {
    /* define variable greeting of the type string */
    string greet;

    /* this runs when the contract is executed */
    constructor (string memory _greet) {
        greet = _greet;
    }

    function newGreeting(string memory _greet) onlyOwner public {
        emit Modified(greet, _greet, greet, _greet);
        greet = _greet;
    }

    /* main function */
    function greeting() public view returns (string memory)  {
        return greet;
    }

    event Modified(
        string indexed oldGreetingIdx, string indexed newGreetingIdx,
        string oldGreeting, string newGreeting);
}
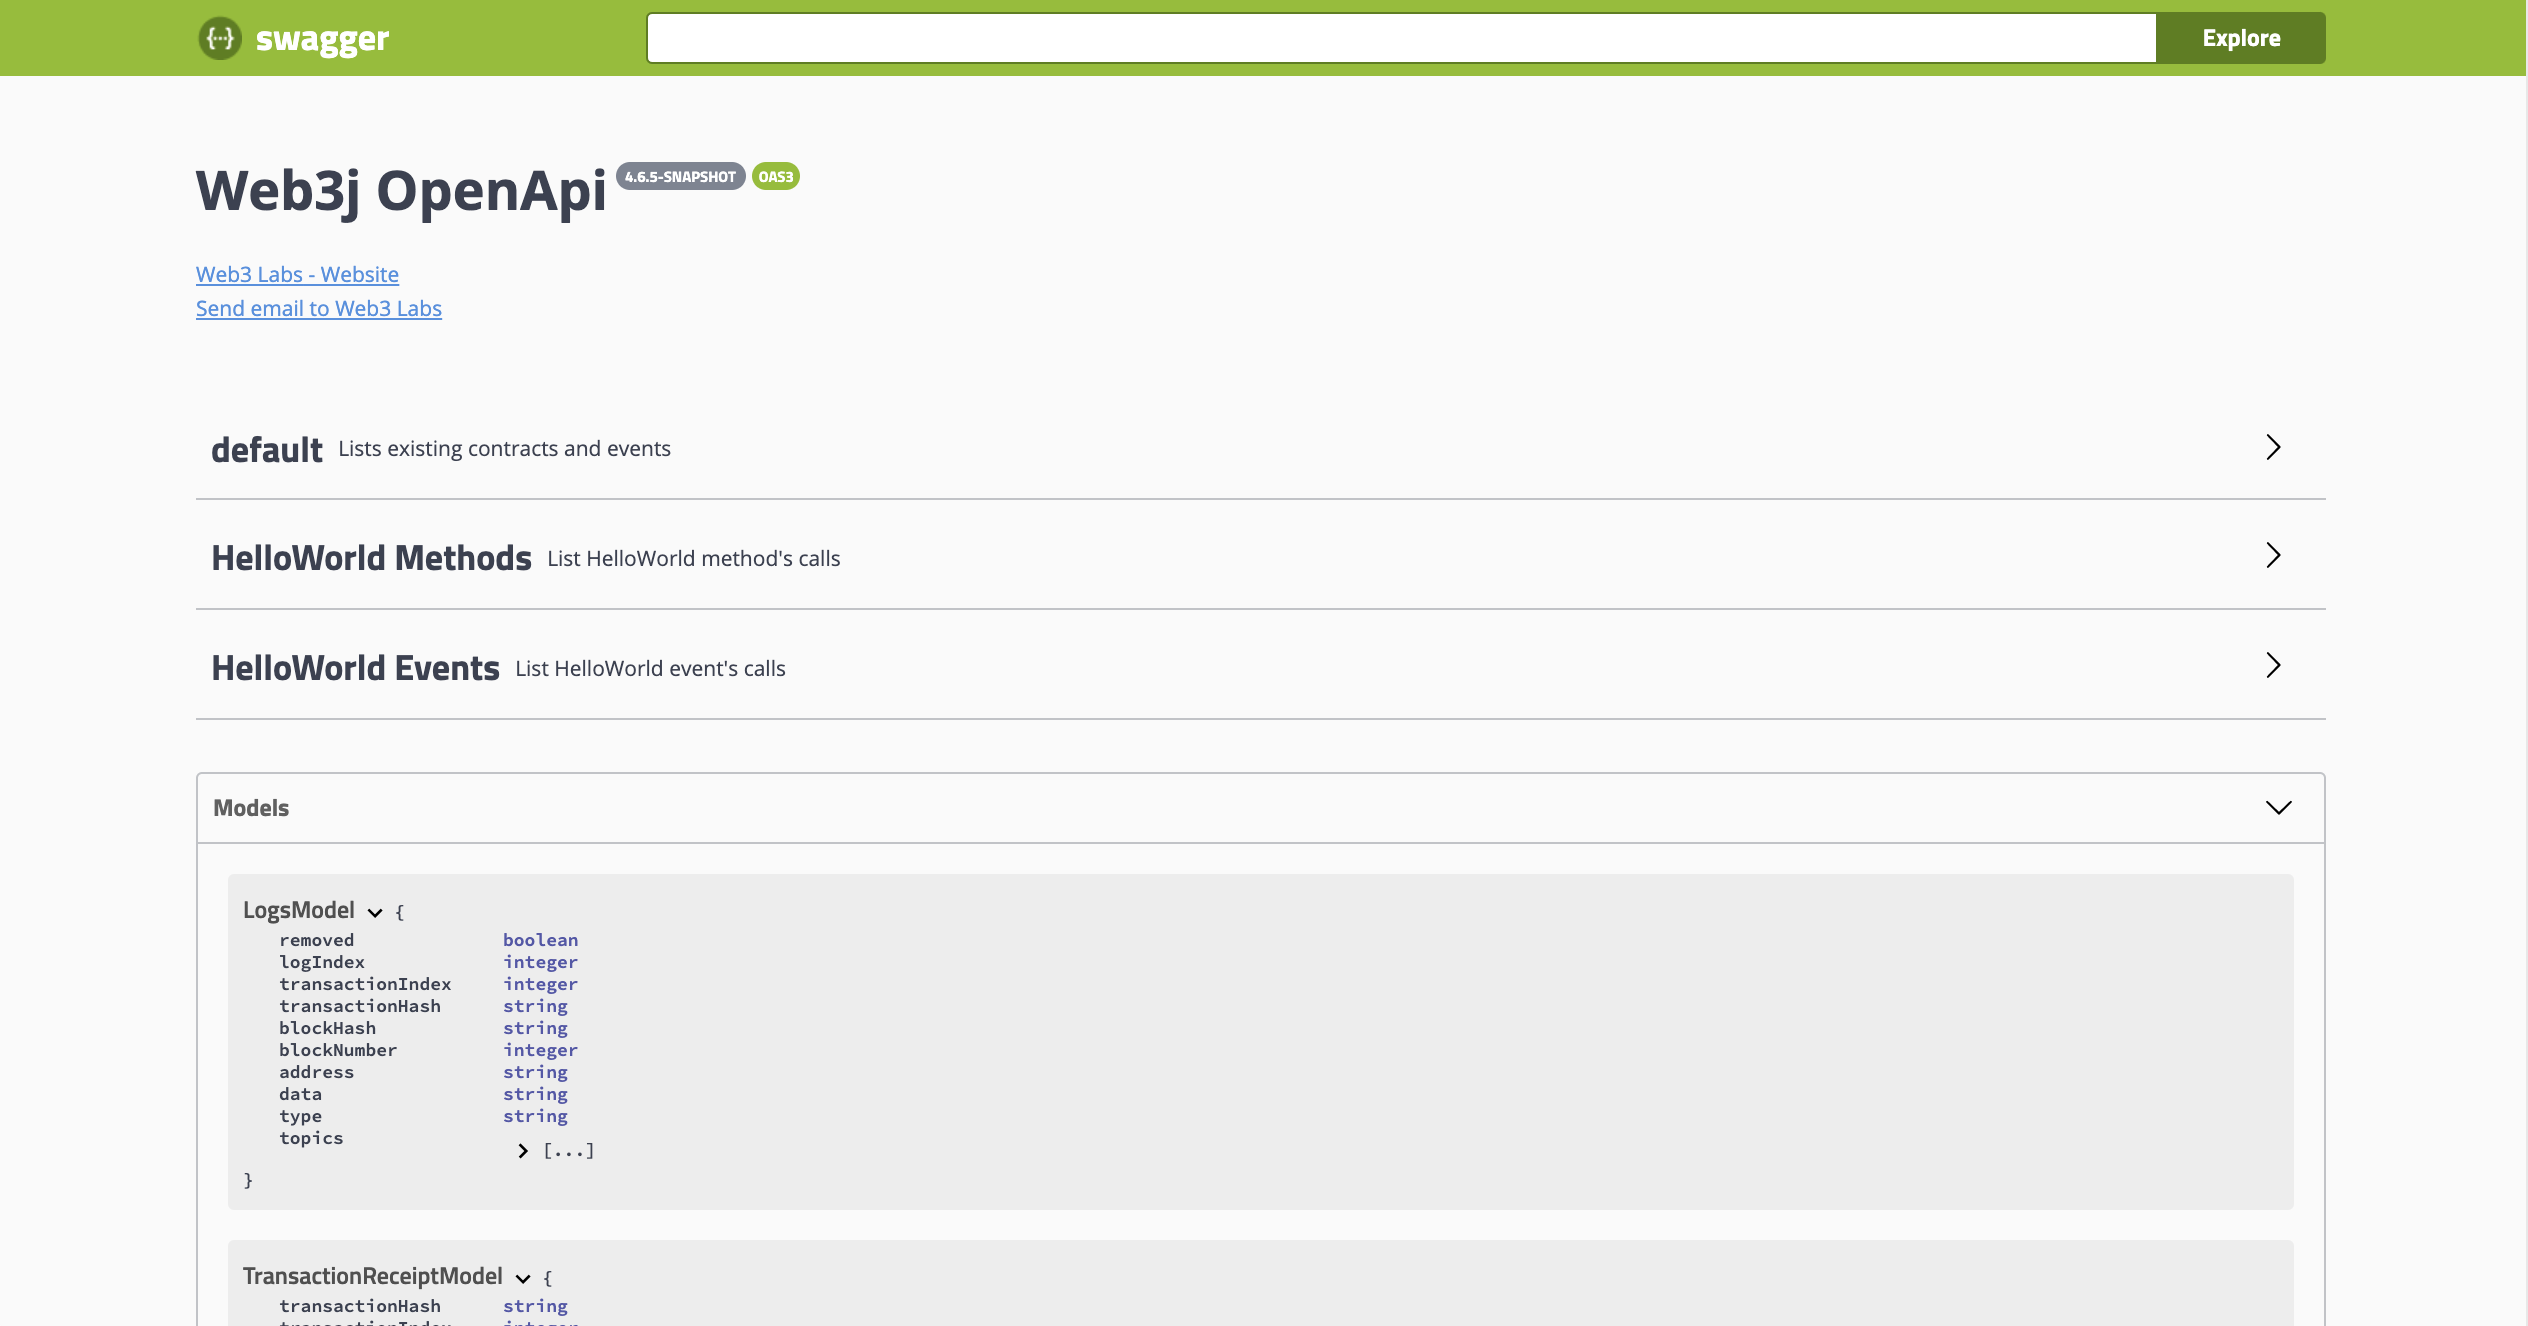
generates the following OpenAPI specs :
{
   "openapi":"3.0.1",
   "info":{
      "title":"Web3j OpenApi",
      "contact":{
         "name":"Web3 Labs",
         "url":"http://web3labs.com",
         "email":"[email protected]"
      },
      "version":"4.9.7"
   },
   "tags":[
      {
         "name":"default",
         "description":"Lists existing contracts and events"
      },
      {
         "name":"HelloWorld Methods",
         "description":"List HelloWorld method's calls"
      },
      {
         "name":"HelloWorld Events",
         "description":"List HelloWorld event's calls"
      }
   ],
   "paths":{
      "/Web3App/contracts/helloworld/{contractAddress}/Kill":{
         "get":{
            "tags":[
               "HelloWorld Methods"
            ],
            "summary":"Execute the Kill method",
            "operationId":"kill",
            "parameters":[
               {
                  "name":"contractAddress",
                  "in":"path",
                  "required":true,
                  "schema":{
                     "type":"string"
                  }
               }
            ],
            "responses":{
               "default":{
                  "description":"default response",
                  "content":{
                     "application/json":{
                        "schema":{
                           "$ref":"#/components/schemas/TransactionReceiptModel"
                        }
                     }
                  }
               }
            }
         }
      },
...
With a corresponding Swagger-UI :
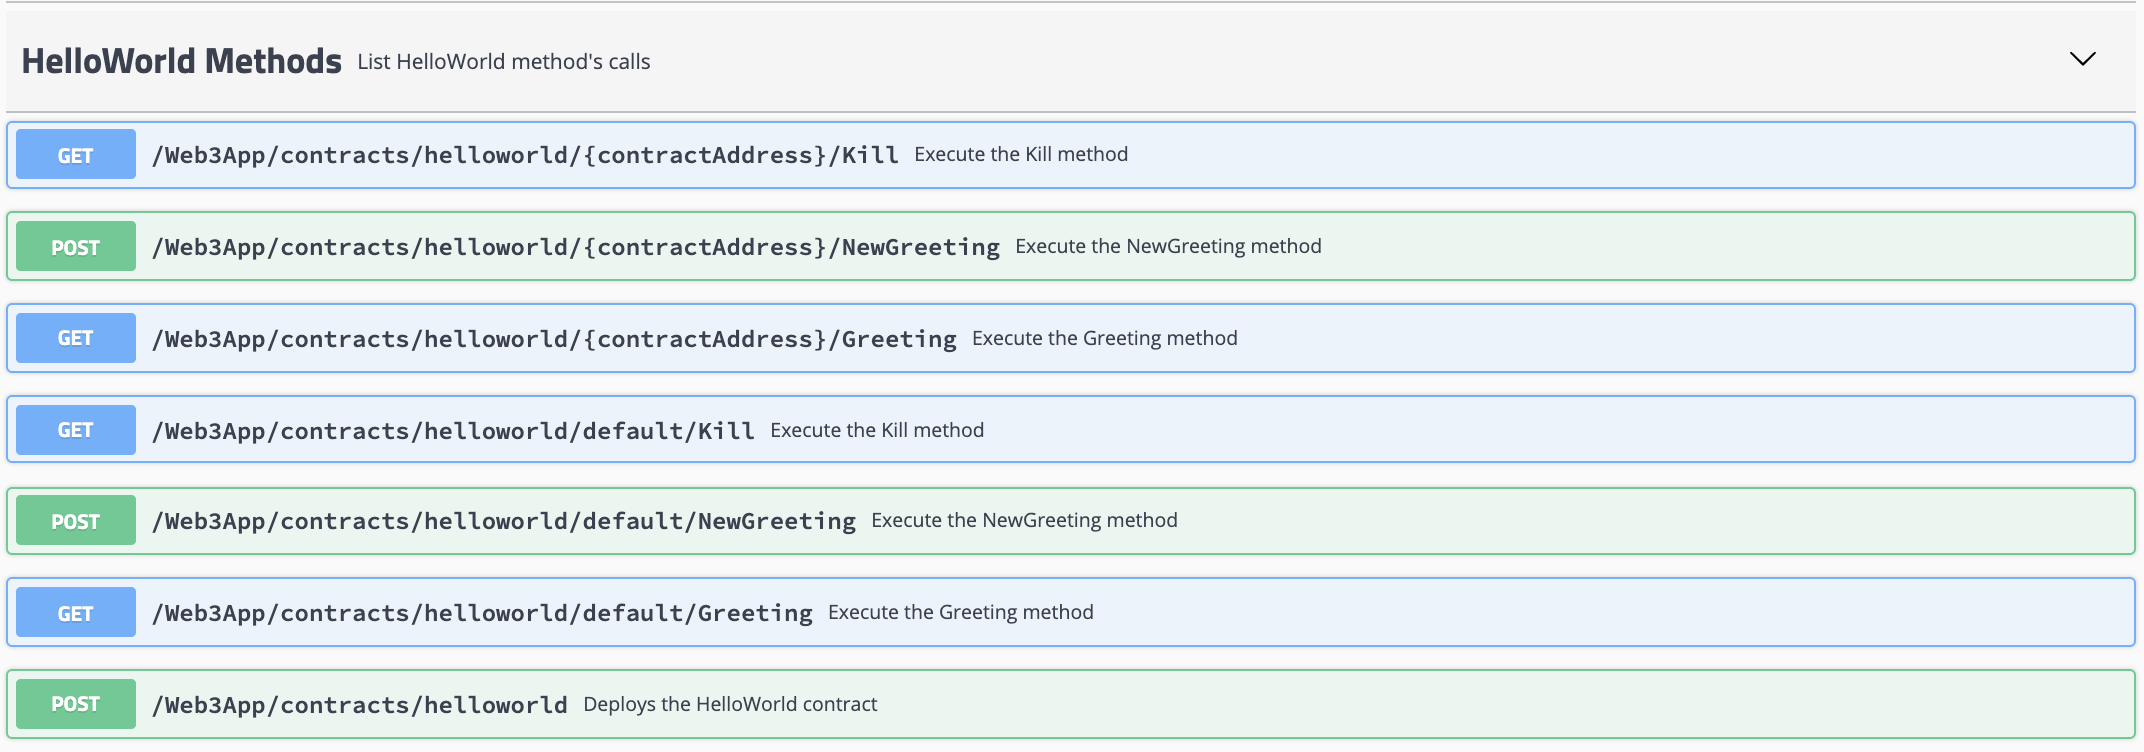
The available methods are:
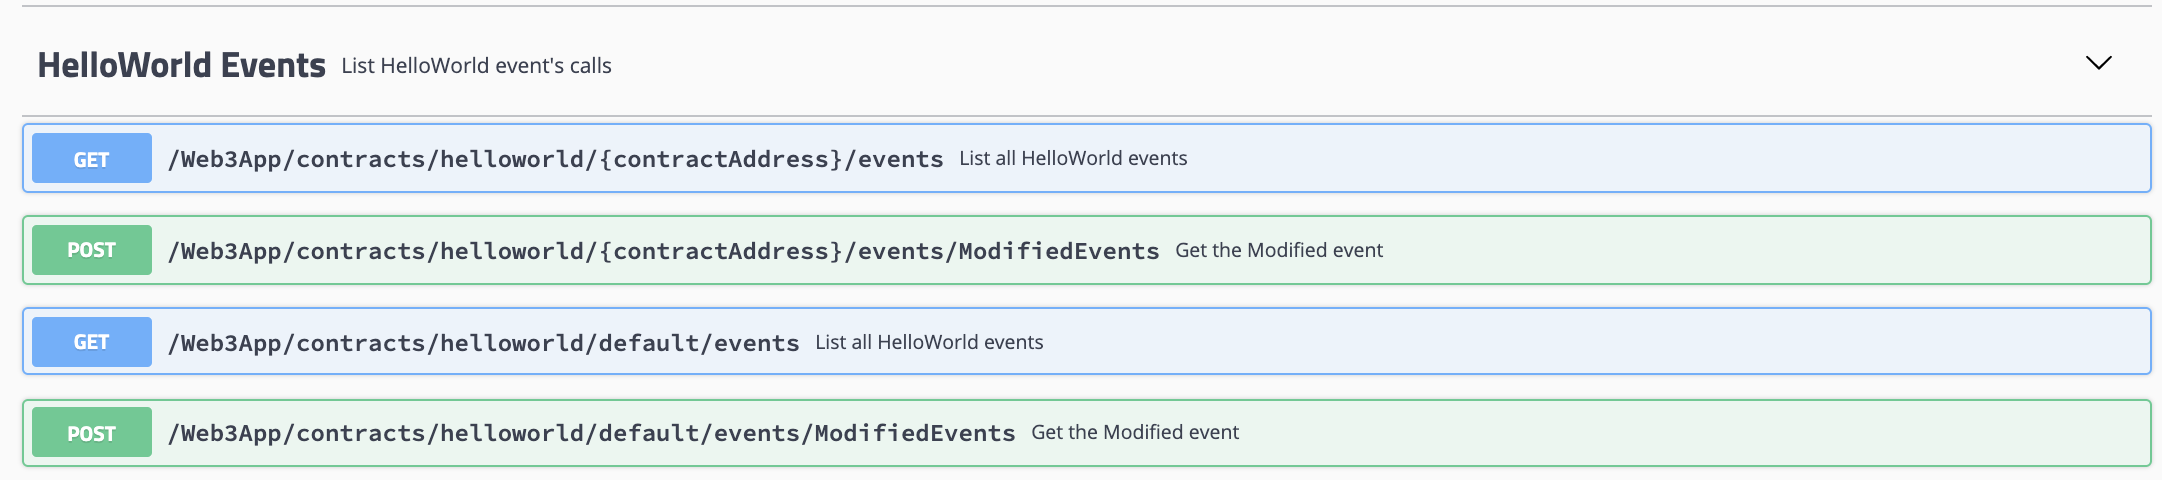
The available events are:
Getting started with Web3j-OpenAPI
Generate a project
To generate an OpenAPI project using the Web3j-OpenAPI generator, you need to have the Web3j-CLI installed on your machine. It’s easy to do (for Windows instructions head here):
$ curl -L get.web3j.io | sh
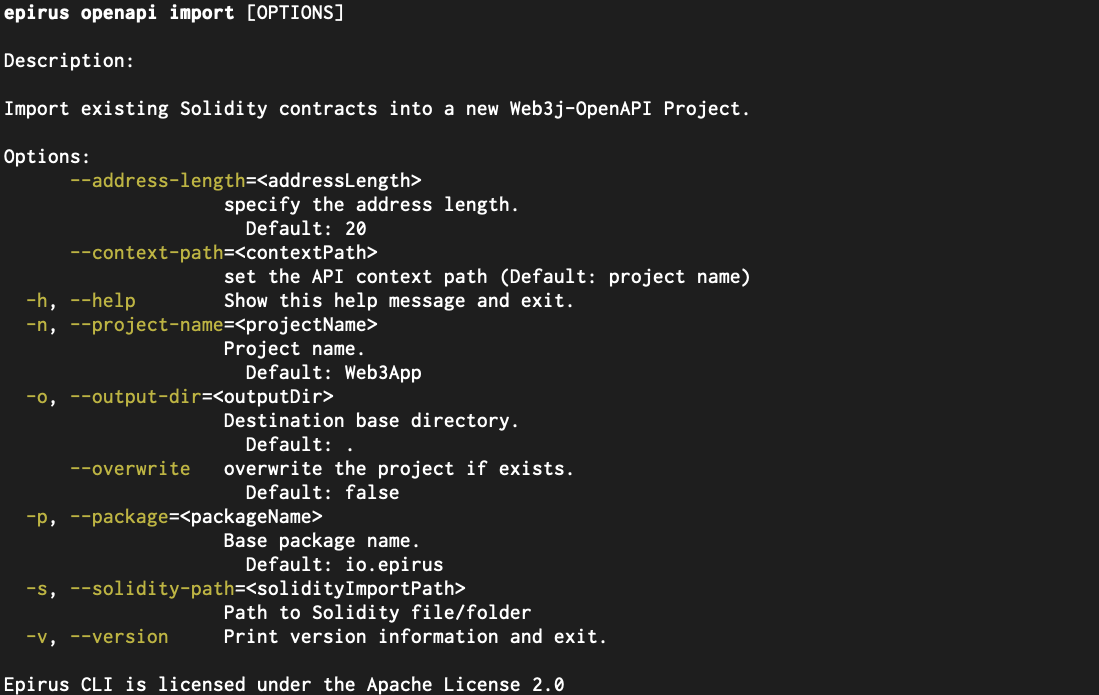
Then, you can run the
$ web3j openapi import --help
To check the generator available options.
In this case, we will be using the above Hello World contract.
Put that contract in a file named HelloWorld.sol for starters.
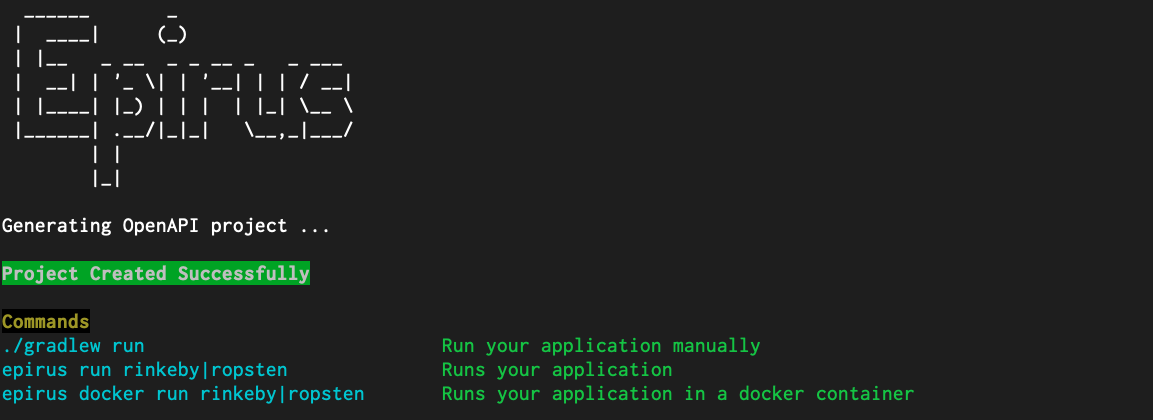
Then, execute the following command:
$ web3j openapi import \
    -s=HelloWorld.sol \
    --package=com.tutorial \
    --project-name=HelloWorldProject \
    --output-dir=.
You should be seeing logs similar to the following:
Configure the project
You can run the project easily, without specifying any configuration, using the Web3j-cli.
If not, you need to specify runtime parameters. for example, the private key or wallet file for the signing,
the node endpoint to connect to, etc.
To see the available options, run the distributions executable or the JAR with the --help flag. You'll get the following display:
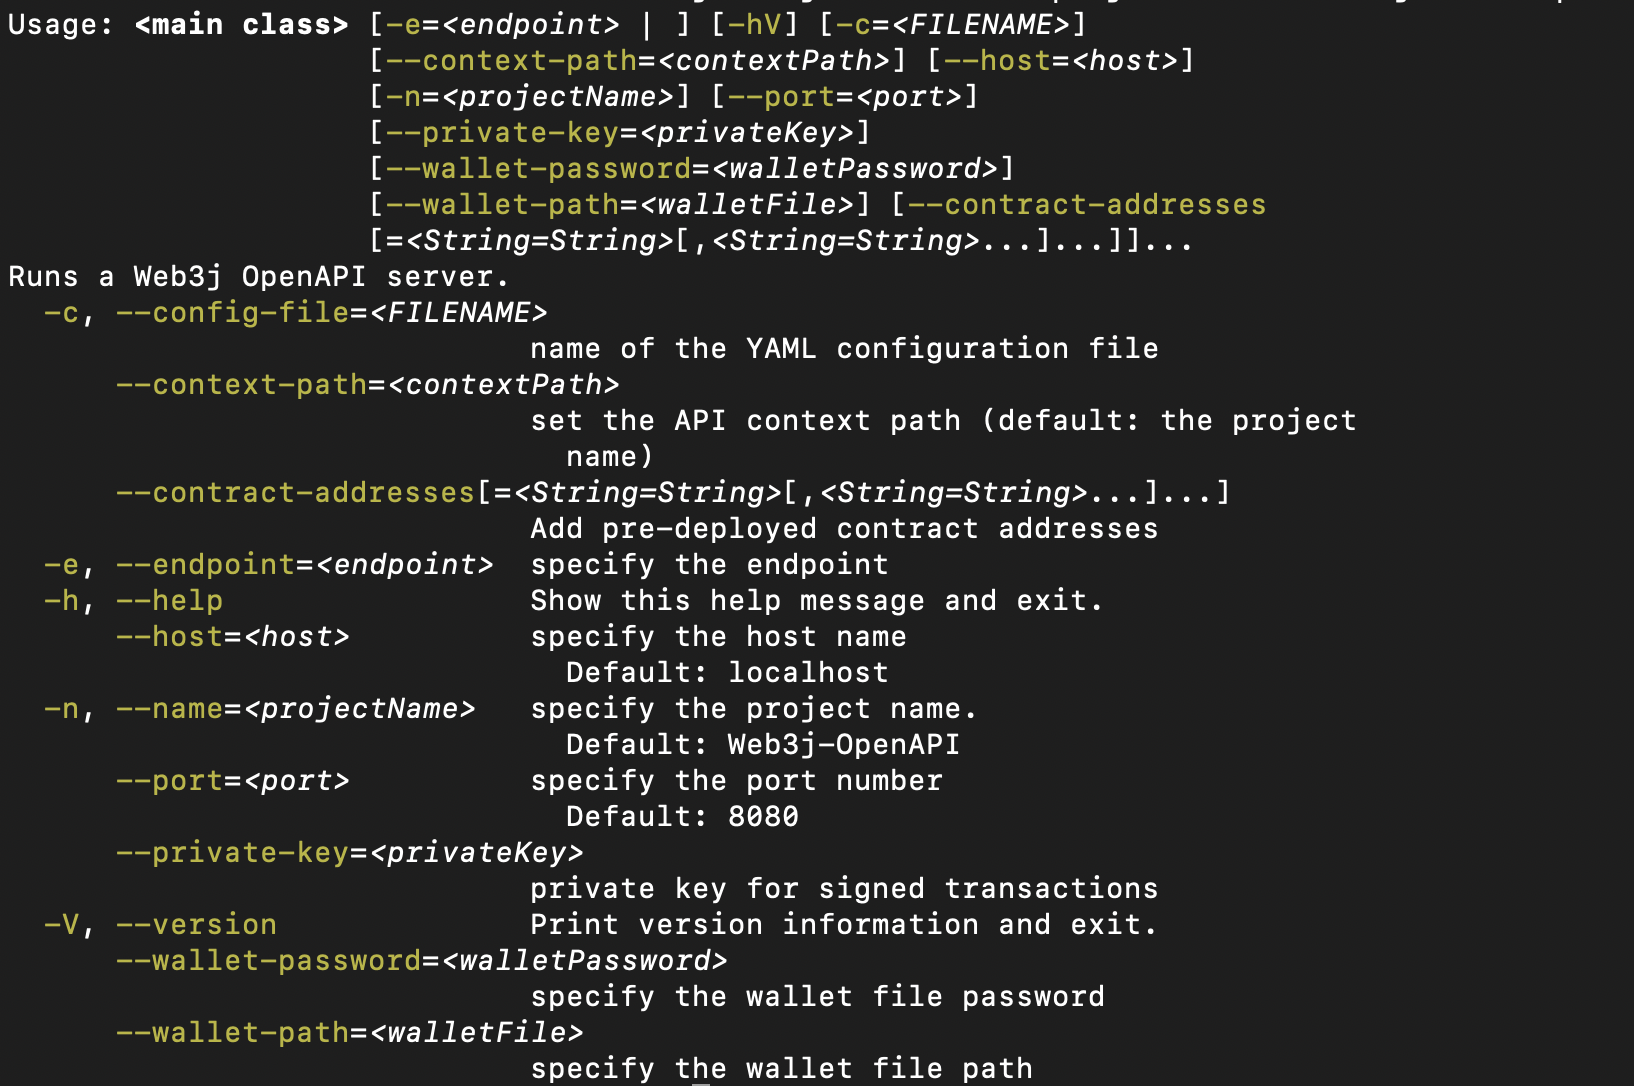
To specify these parameters, you can set the following environment variables:
$ export WEB3J_ENDPOINT=<link_to_your_Ethereum_node>
$ export WEB3J_PRIVATE_KEY=<your_private_key>
$ export WEB3J_OPENAPI_HOST=localhost
$ export WEB3J_OPENAPI_PORT=9090
For more ways to pass these parameters, check the configuration section below.
Run the project
We can run the project directly :
$ ./gradlew run
You should be able to run the server and see the following:

Interact with the generated project
Interactions can be done in multiple ways :
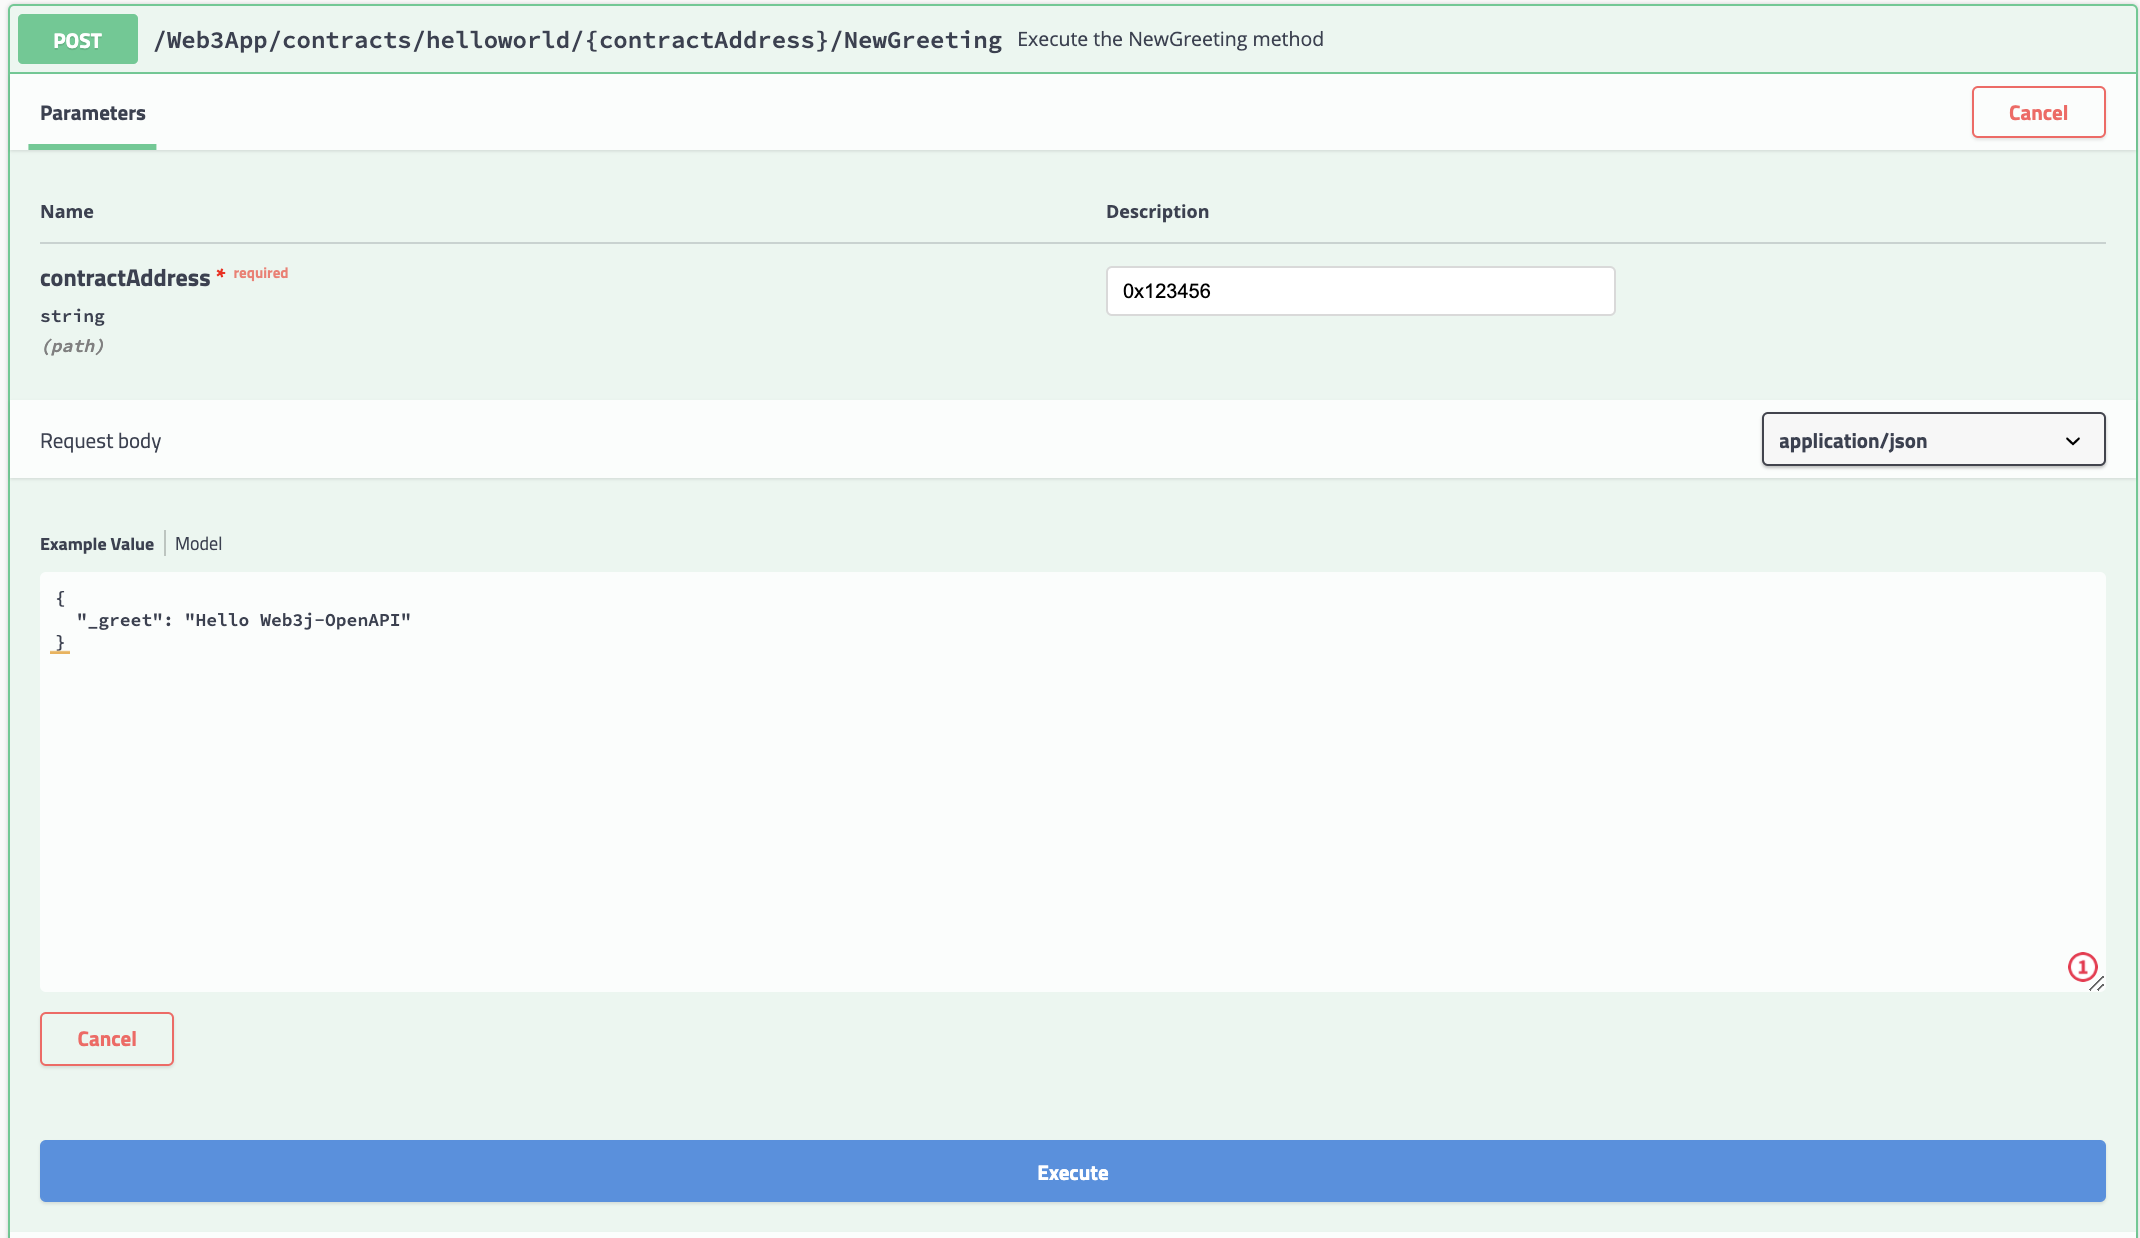
SwaggerUI
The generated SwaggerUI is located on {host}:{port}/swagger-ui and can be used
to do all possible interactions with the API. eg:
HTTP requests
Sending HTTP requests via tools like Curl:
$ curl -X POST "http://{host}:{port}/HelloWorldProject/contracts/helloworld/{contract address}/NewGreeting" -H "accept: application/json" -H "Content-Type: application/json" -d "{\"_greet\":\"Hello Web3j-OpenAPI\"}"
Client application
It is also possible to interact using a Java/Kotlin client application. This latter can be done using our client implementation.
Make sure to add the client dependency to your project.
dependencies {
    implementation "org.web3j.openapi:web3j-openapi-client:4.9.7"
}
Then, you will be able to interact with the API as follows:
val service = ClientService("http://localhost:9090")
val helloWorldProject = ClientFactory.create(HelloWorldProjectApi::class.java, service)

println("Deploying the HelloWorld contract...")

val receipt = helloWorldProject.contracts.helloWorld.deploy(HelloWorldDeployParameters("Hello"))

println("Deployed contract address: ${receipt.contractAddress}")

val newGreetingHash = helloWorldProject.contracts
    .helloWorld
    .load(receipt.contractAddress)
    .newGreeting(NewGreetingParameters("Hello Web3j-OpenAPI"))
    .transactionHash

println("NewGreeting method execution transaction hash: $newGreetingHash")

val greeting = helloWorldProject.contracts
    .helloWorld
    .load(receipt.contractAddress)
    .greeting()
    .result

println("Greeting method result: $greeting")
Ways to generate an OpenAPI project
First, you need to install the Web3j-CLI on your machine.
It’s easy to do (for Windows instructions head here):
$ curl -L get.web3j.io | sh
Generate a Hello World project
A Hello World project is a simple project based on a simple Solidity contract. It is generated using:
$ web3j openapi new
This project can be used as a minimal project to start building your custom application upon.
Generate using custom Solidity smart contracts
To generate a project using your desired smart contracts, use the following command:
$ web3j openapi import \
    --solidity-path <path_to_Solidity_contracts> \
    --project-name <project name> \
    --package <package name>
Generate an executable JAR
The following command will generate an executable JAR ready to be run:
$ web3j openapi jar \
    --solidity-path <path_to_Solidity_contracts>
Generate the REST API only
To generate only the API, ie the defined endpoints with their implementations, use the following:
$ web3j openapi generate \
    --solidity-path <path_to_Solidity_contracts> \
    --with-implementations=true
This command will not generate a whole project structure. Thus, you will not have a runnable application. To have one, check the above sections.
The with-implementations flag is set to true by default. This means that
the RESTful endpoints will be generated along their implementations.
If you prefer to generate only the interfaces. Set that flag to false:
--with-implementations=false
Generate using the web3j-openapi-gradle-plugin
It is possible to generate a Web3j-OpenAPI project directly from your gradle project using the web3j-openapi-gradle-plugin.
Check the documentation for more information.
Run the project
Runtime parameters
Before running the server, there are some parameters that need to be set. There are multiple ways of doing so:
- Environment variables
- Configuration file
- Passing the parameters directly to the JAR or the executable.
Also, you can run the project without worrying about any of this using the Web3j-cli
Supported parameters
| Name | Default value | Description |
|---|---|---|
name |
Generation project name |
The project name |
config file |
~/.web3j/web3j.openapi.<extension> |
A custom configuration file to import extra parameters |
endpoint |
none |
Ethereum node endpoint to target when interacting with the blockchain |
private key |
none |
User private key in hex format prefixed by 0x |
wallet path |
none |
The path to the wallet file (can be absolute or relative) |
wallet password |
none |
The password of the specified wallet file in plain text |
host |
localhost |
The server host (can be an IP address or a hostname) |
port |
8080 |
The server port |
contract addresses |
none |
Use pre-deployed contract addresses: contract1=0x123,contract2=0x1234. All you need to provide to the generator is the ABIs. |
The necessary parameters are:
-
The Ethereum node endpoint to target when interacting with the Ethereum network
endpoint -
Credentials : which can be either
private key, orwallet pathandwallet password
The remaining parameters are optional.
Order of precedence
The parameters can be specified interchangeably between different sources. ie, you can have some defined in a default configuration file and others in environment variables etc.
However, for duplicated values, we enforce the following order :
- CLI arguments
- Custom configuration file specified in the CLI
- Custom configuration file specified in Environment variables
- Default configuration file
- Environment variables
Check the following sections for more information.
CLI arguments
The CLI arguments can be passed to the command the usual way.
Example
Check the Starting the server section below to choose a command.
$ <command> \
    --private-key 0x1234 \
    --name OpenApiProject \
    --endpoint <Ethereum node endpoint> \
    --host localhost \
    --port 9090 \
    --contract-addresses contract1=0x1234,contract2=0x123
Configuration file
You can put the parameters in a configuration file. This latter, can be
YAML, Json or Java properties type of files.
The configuration file can be :
- Put in the default directory :
~/.web3j/web3j.openapi.<extension> - Set in an environment variable:
WEB3J_OPENAPI_CONFIG_FILEwhere the value is the path to the file. eg.
export WEB3J_OPENAPI_CONFIG_FILE=<path_to_the_config_file}
- Set as an argument when running the JAR or the executable:
--config-file
The supported extensions are :
yamlfor aYAMLconfiguration. Example:
contractAddresses:
  helloworld: "0x1234"
  helloworld2: "0x1234"
credentials:
  privateKey: "0x1234"
network:
  endpoint: "<your_node_endpoint_address>"
project:
  name: "OpenApiProject"
server:
  host: "localhost"
  port: 9090
jsonfor aJsonconfiguration. Example:
{
  "contractAddresses": {
    "helloworld": "0x1234",
    "helloworld2": "0x1234"
  },
  "credentials": {
    "privateKey": "0x1234"
  },
  "network": {
    "endpoint": "your node endpoint address"
  },
  "project": {
    "name": "OpenApiProject"
  },
  "server": {
    "host": "localhost",
    "port": 9090
  }
}
propertiesfor aJava propertiesconfiguration. Example:
contractAddresses=helloworld=0x1234,helloworld2=0x1234
credentials.privateKey=0x1234
network.endpoint=your node endpoint address
project.name=OpenApiProject
server.host=localhost
server.port=9090
Environment variables
The easiest way to provide the runtime parameters is through environment variables.
The rule is to:
-
Replace the
-with a_:private-key => private_key -
Upper case the options' names :
private-key => PRIVATE_KEY
Example
$ export WEB3J_ENDPOINT=<link_to_your_Ethereum_node>
$ export WEB3J_OPENAPI_HOST=localhost
$ export WEB3J_OPENAPI_PORT=9090
$ export WEB3J_OPENAPI_NAME=Web3jOpenAPI
$ export WEB3J_OPENAPI_CONTRACT_ADDRESSES=helloworld=0x1234,helloworld2=0x12345
$ export WEB3J_OEPNAPI_CONFIG_FILE=~/myConfig.yaml
And one of the following:
- A raw private key :
$ export WEB3J_PRIVATE_KEY=0x1234
- A wallet :
$ export WEB3J_WALLET_PATH=~/myWallet.json
$ export WEB3J_WALLET_PASSWORD=myStrongPassword
Start the server
Starting the server can be done in the following ways:
The generated JAR
A JAR can be generated using the following command:
$ ./gradlew shadowJar
It will be found under the build/libs directory.
The generated JAR can be run using the following:
$ java -jar build/libs/<project name>-all.jar <parameters>
check the parameters section above for the supported parameters.
The distribution executable
A server executable can be generated using the following:
$ ./gradlew installShadowDist <parameters>
Which can be found in build/install/<app name>-shadow/bin/
Using gradle
To run the project using gradle. Make sure to have set some environment variables or configuration file as specified above.
Then, run the following :
$ ./gradlew run
The Web3j-OpenAPI client
Among the available ways to interact with a Web3j-OpenAPI server, there is the Kotlin client.
It is easy to use.
Start by adding dependency to the client:
dependencies {
    implementation "org.web3j.openapi:web3j-openapi-client:4.9.7"
}
Then, within a client application:
val service = ClientService("http://localhost:9090")
val app = ClientFactory.create(<AppNameApi>::class.java, service)

// Then you have access to all the API resources
val receipt = app.contracts.contractName.deploy()

println("Deployment receipt: ${receipt.contractAddress}")

// ...
Handling events
In web3j-OpenAPI, we handle events using Server-Sent Events SSE.
In a nutshell, SSE is a one way mechanism that allows a server to asynchronously push data from the server to the client once the client-server connection is established by the client.
To query events from Kotlin/Java. Add the web3j-openapi-client dependency as done above.
Then, use the following code:
val service = ClientService("http://localhost:9090")
val app = ClientFactory.create(AppNameApi::class.java, service)

// Start listening for events
val event = app.contracts.<contract_name>.load(<contract_Address>)
        .events
        .<event_name>
        .onEvent { println("Received event: $it") }

// Trigger an event
app.contracts
    .<contract_name>
    .load(<contract_Address>)
    .<method_triggering_event>(<method_parameters>)
Then run this code. You should be able to see events printing on the screen.