Web3j EVM
Web3j-evm is an embedded freestanding Ethereum EVM and ledger running within a Java process, which can be used for unit and integration testing your Web3j projects.
As everything is local and in-process, there is no need to start up external Ethereum nodes, which helps with easy of use and performance.
Everything runs within the JVM process, including EVM bytecode, which allows for easy debugging of Solidity smart contracts.
Getting started
Often you'd use this together with the web3j-unit project, allowing you to run unit and integration tests without the need to start an Ethereum node.
If you want to use this within our own project directly, you would need the EVM dependency + a few external libraries. Have a look at the example project on how to do this.
repositories {
    mavenCentral()
    jcenter()
}

dependencies {
    implementation "org.web3j:core:4.10.0"
    implementation "org.web3j:web3j-evm:4.10.0"
}
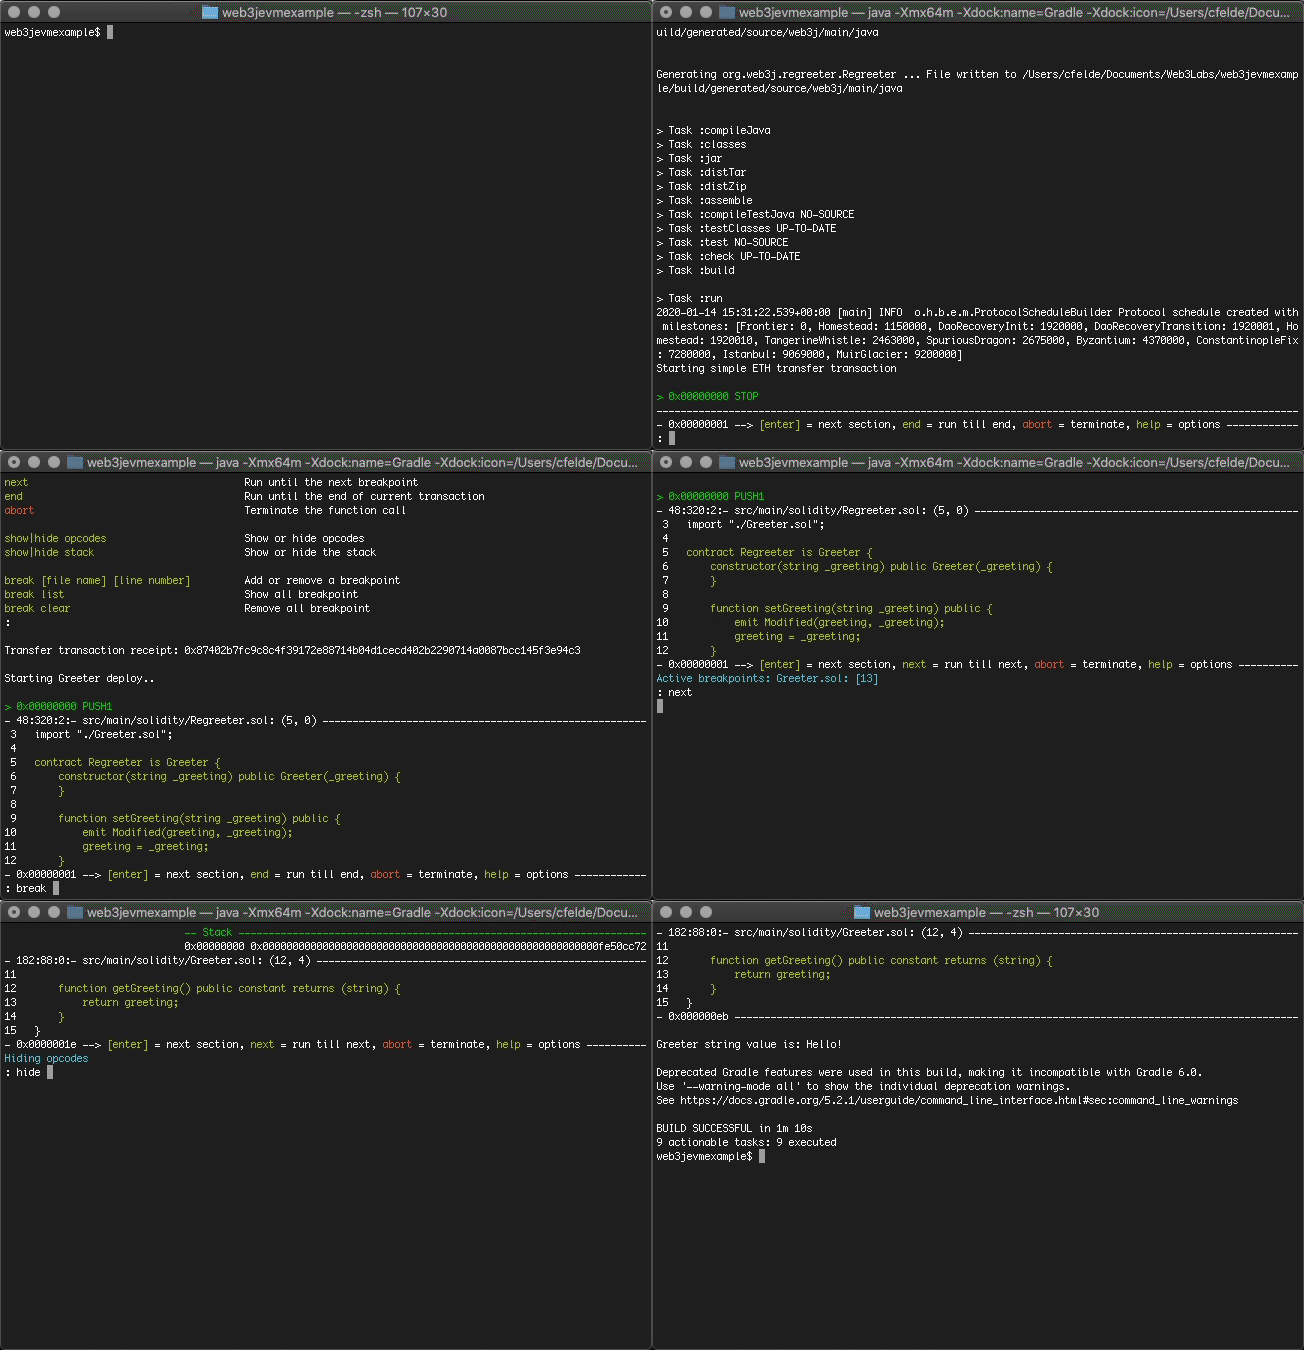
Below is a simple demonstration of ETH transactions, contract deployment and simple contract interactions. Using the ConsoleDebugTracer, we're able to step through the EVM bytecode, inspect the stack and also see where in the related solidity code we're currently at.
The demo also shows to how to get started with the EmbeddedWeb3jService
which is what you'd use when building your web3j instance.
This demo is available on the example project.

Debugging smart contracts and transactions
While running locally with the embedded EVM it is possible to debug the internal state when deploying and invoking functions on a contract.
You do this by giving the embedded Web3j service what's called an operation tracer. We have developed one which allows for console-based debugging sessions and code walkthroughs called ConsoleDebugTracer.
To enable this simply pass an instance of this in as a second parameter on the EmbeddedWeb3jService constructor.
OperationTracer operationTracer = new ConsoleDebugTracer();

Web3j web3j = Web3j.build(new EmbeddedWeb3jService(configuration, operationTracer));
When your project leverages our gradle plugin the ConsoleDebugTracer will automatically pick up Solidity contract metadata and use that to display source code context. Usually, these metadata json files are stored within build/resources/main/solidity. If you have chosen to place these elsewhere you will need to specify their location when creating the debugger instance:
OperationTracer operationTracer = new ConsoleDebugTracer(new File("alternative/metadata/file/location"));
Options while debugging
The ConsoleDebugTracer allows you to interact with the debugging session using your terminal. Several options are available as shown below. You can also see these in the terminal by using the help option.
| Command line option | Description |
|---|---|
| [enter] | Continue running until next code section. |
| [number] | Step forward X number of opcodes. |
| next | Run until the next breakpoint. |
| end | Run until the end of current transaction. |
| abort | Terminate the function call. |
| show|hide opcodes | Show or hide opcodes. |
| show|hide stack | Show or hide the stack. |
| break [file name] [line number] | Add or remove a breakpoint. |
| break list | Show all breakpoint. |
| break clear | Remove all breakpoint. |
For example, assume I'm debugging a Solidity contract with its source code stored in a file called Greeter.sol.
If I want to have the debugger stop at a specific line in that file I'd add a breakpoint with the break option: break Greeter.sol 13. Hitting enter after adding that breakpoint will make the debugger progress until it reaches line 13 in Greeter.sol.
Likewise, if I only want to see the Solidity source code and don't care to see opcodes and the stack, I'd execute the hide opcodes and hide stack commands.
Embedded Ethereum
Usually when interacting with Ethereum you do so by connecting to an Ethereum node. This node can either be hosted externally, or it might be one you've started locally.
In either case, you need to connect to another process to make transactions, deploy contracts or interact with these contracts. This brings with it a few drawbacks:
-
You need to manage this external dependency, either through connection configuration or through a separate local application
-
Communication between your JVM, which runs your Web3j integrations, and this external Ethereum process breaks the flow and adds lag
While sometimes you do want this external dependency, for example when you are doing transactions on Ethereum mainnet or a testnet, it is often unwanted while doing local development.
The Web3j EVM library solves this by providing an embedded EVM and associated ledger. This EVM runs within the same JVM as your code, freeing you from needing to make external connections. No other processes are needed as the EVM and the ledger are themselves coded in Java, and the Web3j EVM is simply used as a library within your code.
If you want to use this feature within your unit and integration tests, we would recommend you explore the Web3j unit library as that provides a more complete testing experience.
How to run Web3j with embedded EVM
As shown in the EVM example project, using the embedded EVM is as easy as adding required dependencies and then use the EmbeddedWeb3jService.
repositories {
    mavenCentral()
    jcenter()
}

dependencies {
    implementation "org.web3j:core:$web3jVersion"
    implementation "org.web3j:web3j-evm:$web3jVersion"
}
Web3j web3j = Web3j.build(new EmbeddedWeb3jService(configuration));
The configuration given to the embedded Web3j service includes the address you want to make your own and also how much test Ether you want to pre-fund on this account.
Assuming you have a Web3j wallet already, you can create this configuration object as shown next:
Credentials credentials = WalletUtils.loadCredentials("Wallet password", "wallet.json");

Configuration configuration = new Configuration(new Address(credentials.getAddress()), 10);
With this configured you can now use your Web3j instance as normal.